Geofences and Points of Interest
RemotaSafe allows you to create, edit, delete, and view "Geofences and Points of Interest (POIs)" directly on the map. The availability and use of these features can be managed through Security permissions.
What are they?
Geofences are virtual perimeters defined by geographic coordinates or geometric shapes (such as circles, polygons, etc.) that mark a specific region on the map. They are used for security monitoring, logistics, and more.
Points of Interest (POIs) are specific locations on the map that serve as references or markers. They are defined by geographic coordinates and can be used for various purposes depending on user needs.
Key Features
- Device Monitoring: Geofences monitor when trackable devices enter or exit a defined area.
- Alert Generation: RemotaSafe provides an alert system that triggers based on activity within a geofence.
Interface
The Geofences and POIs side tab displays a list of all created geofences and points of interest. You can use the search feature to quickly find specific items.
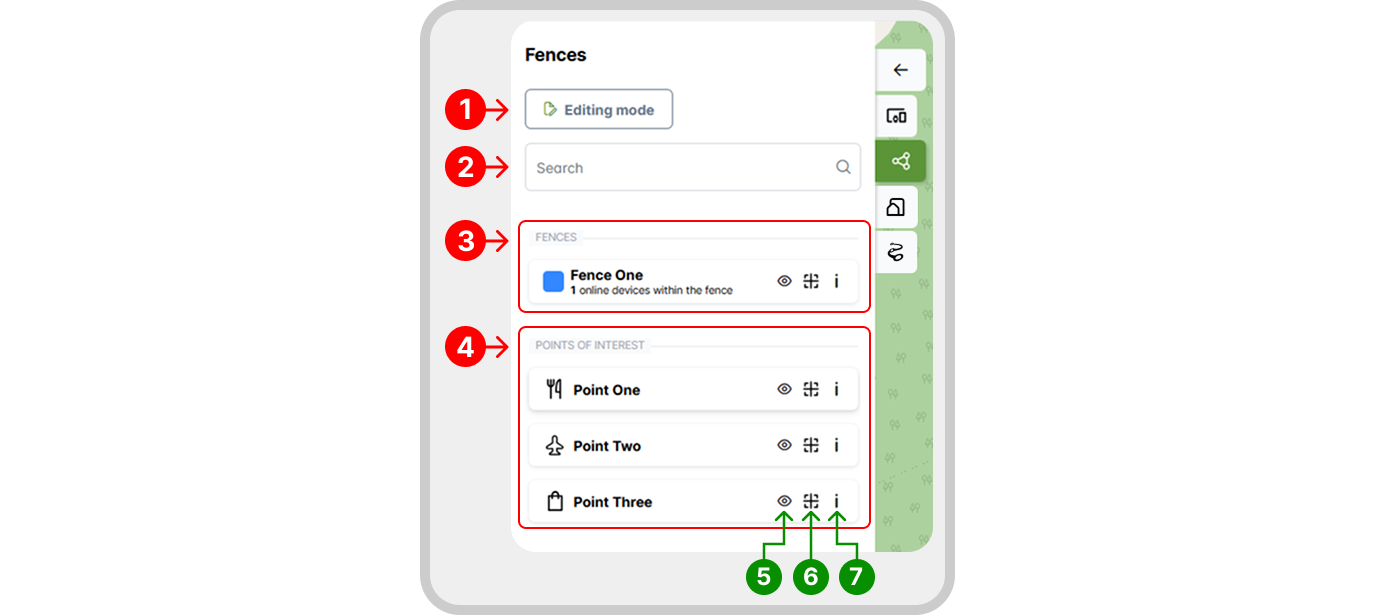
- Edit Mode.
- Search by name.
- View created geofences.
- View created Points of Interest.
- Hide/show on map.
- Center on map.
- Alert history and detailed information.
Edit Mode
Edit Mode enables the tools for creating, modifying, and deleting geofences and POIs, based on user permissions.
Create
To create fences or points of interest, the user must have creation permissions. Once permissions are granted, the respective buttons for creating points of interest and drawing fences will be enabled. You can find them on the left side of the map, next to the side tab. If you want to cancel a creation, simply deselect the tool.
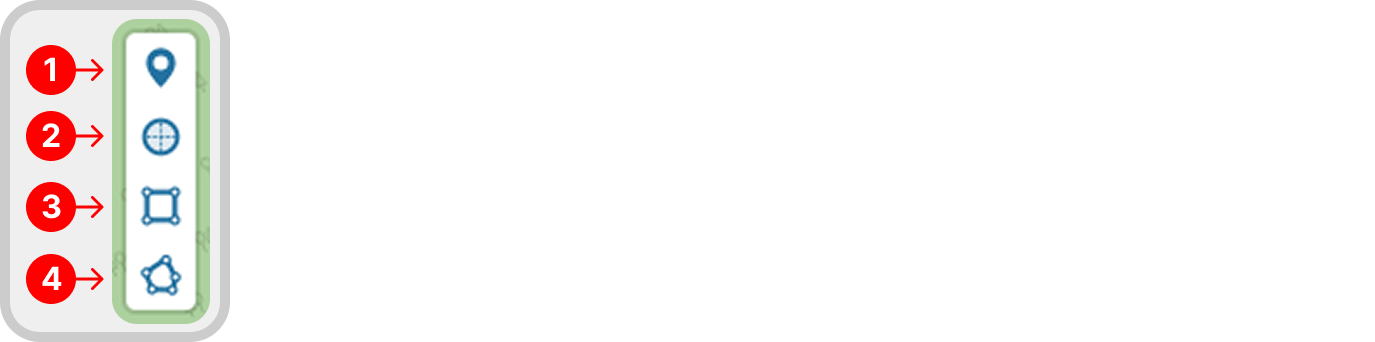
- Add Point of Interest.
- Creation tool: Circle.
- Creation tool: Square or rectangle.
- Creation tool: Free Polygon.
After adding a geofence or POI, edit the element to adjust its properties for better usability.
Points of Interest
- Select the add point of interest tool.
- Click on the desired location on the map to place the marker.
- Change the desired record properties and save your changes.
Geofences
To create a fence, select the desired creation tool and follow the instructions below.
- Circle: Click to place the center of the circle, move the cursor to define the radius, and click again to complete the creation.
- Squares or Rectangles: Click to place the first vertex, move the cursor to draw the shape, and click again to complete the creation.
- Free Polygon: Click on the map to place the desired vertices of the polygon. The final polygon must contain at least 3 vertices. To finish the drawing, close the polygon by clicking on the first vertex placed.
Edit
RemotaSafe also provides editing tools, allowing you to move (1), edit (2), rotate (3), and crop (4) the fences.
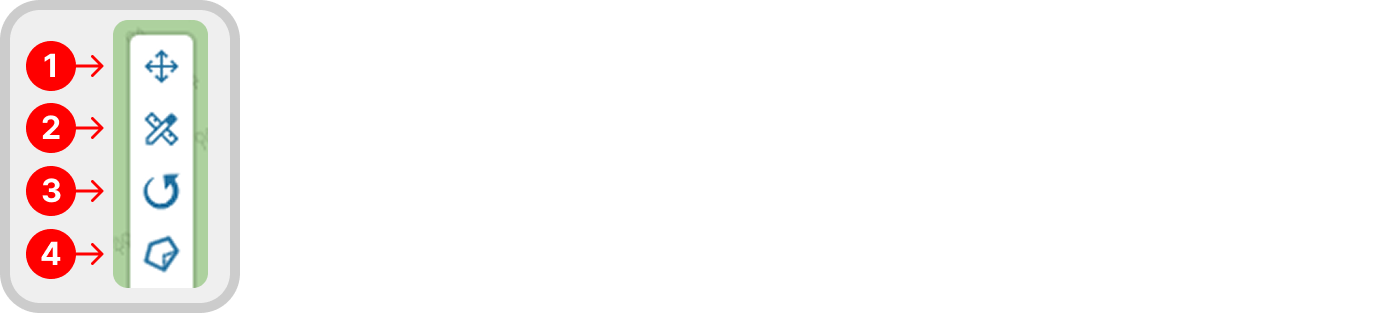
Clicking an existing vertex during editing will automatically generate new points, allowing for more precise and customized shape adjustments.
Example
Below is an example of using the "Edit vertices" tool.
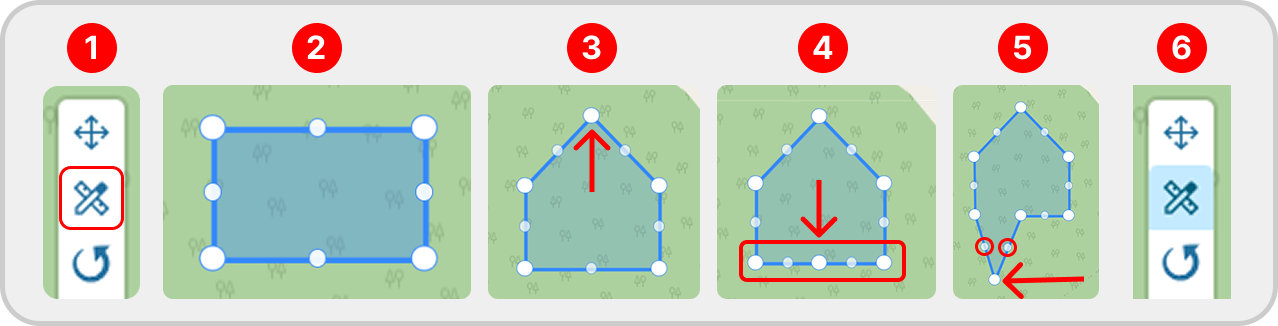
- Tool selection.
- Vertices are automatically displayed for the geofences on the map.
- Changing the shape of the geofence.
- Clicking the indicated central point creates 2 new vertices for editing.
- Using one of the newly created points (as shown by the arrow) to further refine the shape. New vertices appear as you adjust.
- Click on the tool again to finish editing.
Delete
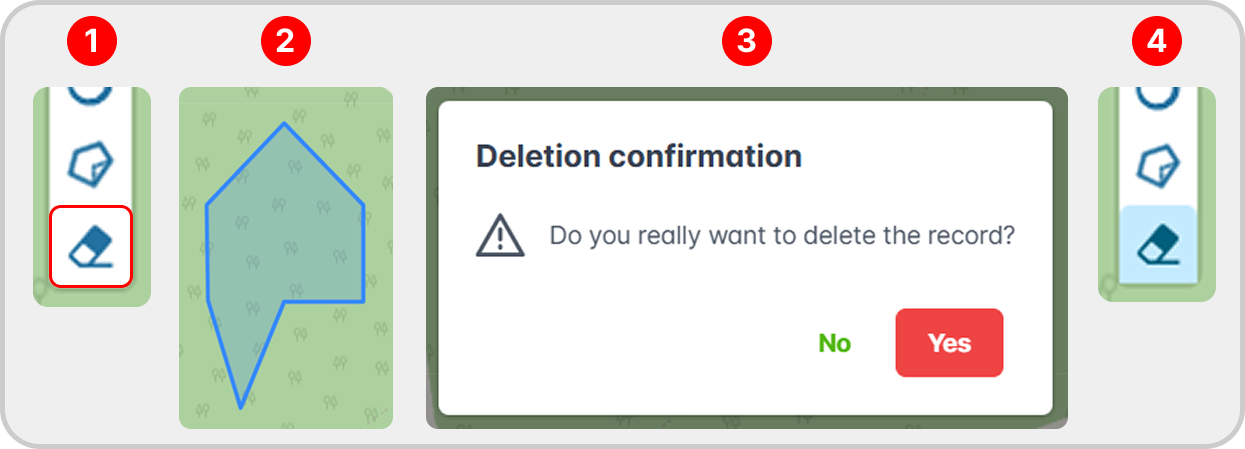
To delete a fence or point of interest, select the “delete tool” (1), click on an element (2), and confirm its deletion (3). Click on the tool again to deselect it (4).
Helper Tools
There are two helper tools available during the creation or editing process:
- MAGNET
- SHAPE ZOOM
Purpose:
- Facilitate precise snapping between shapes.
- Prevent minor misalignments.
- Ensure continuity between edges.
How it works:
- When the cursor moves near an edge, it is automatically attracted (snapped) to it.
- The created point will align exactly with the detected edge.
- It works during both the creation and editing of shapes.
When to use it:
- When connecting one shape to another.
- When adjusting boundaries that must be perfectly aligned.
Shape Zoom automatically zooms in and centers the view on the shape closest to the clicked point.
How it works:
- When you click on the map, the system looks for the nearest existing shape.
- If a shape is found, the screen:
- Centers on that shape.
- Adjusts the zoom level to fit it entirely on the screen.
- If no shape is nearby, no zoom is applied.
Important:
- The click determines which shape is used as a reference.
- Clicking far away from any shape will have no effect.
When to use it:
- To quickly zoom into an existing shape.
- To edit or continue creating a nearby shape.
- On large maps, where finding a shape manually is difficult.